In this article we will discuss about the isolation of bacteria present in soil:- 1. Methods of Isolation 2. Observation of Bacteria 3. Staining of Bacteria 4. Staining Procedure 5. Staining of Spore 6. Staining of Capsule 7. Staining of Flagella.
Methods of Isolation:
Bacteria present in soil can be isolated by several methods. However, isolation of specific groups like the nitrogen fixers, anaerobic forms or human pathogens require enrichment method.
1. Dilution Plate Method:
i.e. Spread plate method (Fig. 2.1):
Principle:
This basic technique used for bacteria (and other microorganisms like fungi) especially from soil, helps in obtaining isolated colonies where dilutions prevent crowding of colonies.
Requirements:
1. Soil samples and sieve (2 mm pore).
2. Water blanks – 99 ml and 9 ml.
3. Pipettes (5 ml graduated).
4. Oven.
5. Burrell’s wrist action shaker.
6. Incubator, oven, balance.
7. Agar plates—Nutrient agar.
8. Pentachloronitrobenzene (PCNB) 25-50 ppm.
9. Colony counter.
10. Spreader.
11. Bunsen flame/ Laminar clean air flow.
12. Glass marking pencil.
Procedure:
1. Sift soil through a 2 mm sieve and weigh one gram each (2 samples) in sterile previously weighed containers.
2. Keep 1 g in oven at 105°-110°C overnight, reweigh the dried sample and calculate moisture content.
3. Add the other one gram sample to a 99 ml water blank in a 250 ml Erlynmeyer flask.
4. Keep the flask on a Burrell’s wrist action shaker for 30 minutes and label, this as 1/100 dilution.
5. While the flask is in motion, pipette out one ml of 1/100 dilution to a 9 ml water 100 blank, label this as 1/1000 dilution.
6. Transfer 1ml dilution through successive 9 ml water blanks until a final dilution of 1/10,000 is obtained.
7. Transfer aseptically 0.1 ml/(1.0 ml for fungi and actinomycetes) of each dilution, after shaking vigorously, to each of the several Petri dishes with 12-15 ml of appropriate agar medium (Nutrient agar for bacteria) which is either cooled and solidified or cooled to just above solidification temperature (45°C). Mark dilution on each plate.
8. Spread the suspension in case of solidified medium by rotating the plate or spread by means of a sterile glass (rod) spreader and in case of semi-solid medium, rotate the plate and allow it to solidify.
9. Incubate at 37°C for 24-48 hours for bacteria (5-10 days for fungi and actinomycetes).
10. After incubation, count the colonies on a colony counter (visually for fungi) for bacteria and actinomycetes.
Calculations:
Number of bacteria /spores per gram of soil = Number of colonies X Dilution factor on a dry wt. basis, e.g. if there are 20 colonies in a plate with1/1000 dilution.
The number of viable cells/spores per gram of soil = 20 X 1000 = 20,000.
Calculate on a dry weight basis.
11. Note down colony characters and transfer them to the respective agar slants, incubate and preserve them for further studies.
To prevent growth of Actinomycetes and favour bacterial colony development pentachloronitrobenzene (PCNB) at a concentration of 25-50 ppm is first added to the medium.
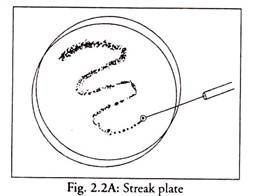
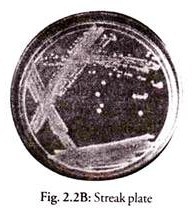
2. Streak Plate Method (Figs. 2.2A and B):
This is the most practical method of obtaining discrete colonies and pure cultures.
Principle:
When a mixture of inoculum is spread by streaking on an agar plate, using a loop isolated colonies appear towards the ends of streaks.
Requirements:
1. Soil dilution/ 24-48 hour nutrient broth culture of Staphylococcus, Streptococcus, Escherichia coli.
2. Nutrient agar plates.
3. Inoculating loop.
4. Bunsen burner/Laminar clean air flow.
5. Glass marking pencil.
6. Incubator.
Procedure:
1. Inoculate a loop full of soil dilution/ mixed culture on the agar surface and place it at the farthest end from you and streak the inoculum from side to side in parallel lines across the surface of the area.
2. Incubate the plates upside down at 37°C for 24-48 hours.
3. Isolated colonies from the end of the streak are picked up and inoculated on slants and used for further studies.
3. Pour Plate Method:
Pour plate method is used mainly for bacteria and rarely for fungi and actinomycetes. Successive dilutions of the inoculum (original one) are added into sterile Petri plates to which melted cooled (45°C) agar medium is added and thoroughly mixed by rotating it and incubated after solidification.
Principle:
Dilutions of original inoculum will have lesser and lesser number of cells which will be trapped at different places and isolated colonies will be obtained.
Requirements:
1. 24-48 hour cultures of Staphylococcus and Escherichia coli or of Aspergillus and Penicillium spores or soil dilutions.
2. Seven tubes with 20 ml nutrient agar/ Potato Dextrose Agar (for fungi).
3. Sterile 9 ml water blanks — six.
4. Sterile Petri dishes — seven.
5. Sterile 1 ml pipettes — seven.
6. Test tube rack.
7. Water bath.
8. Bunsen flame/laminar clean air flow hood.
9. Glass marking pencil.
Procedure:
1. Keep seven tubes with agar in water bath for melting and allow them to cool to 45°C.
2. Mix the two cultures of bacteria / fungi in the empty tube or add 1/100 dilution of soil and label it as one.
3. Label Petri plates one to seven.
4. Place tube No. 1 with culture mixture/ soil dilution and tube No. 2-7 with sterile water blank tubes on the rack.
5. Aseptically remove 1 ml of culture mixture or soil suspension, after mixing well, from tube No. 1 to tube No. 2 using separate sterile pipette. Make serial dilutions, each time shaking the suspension and using separate sterile pipettes.
6. At the time of transfer of 1 ml of each suspension, use the same pipette to the Petri plates 1 to 7.
7. Add nutrient agar (PDA) from tubes (at 45°C) to each of the Petri plate and rotate the plates gently in order that the dilution gets evenly mixed with melted agar medium.
8. Incubate the plates in an inverted position at 37°C for 24-48 hours.
Individual colonies come up on the agar plate and each colony represents one viable cell or spore.
4. Membrane Filter Technique:
Molecular membrane filters are either cellulosic or plastic ones with a pore size smaller than that of bacteria. Normally the ones with a pore size 0.45 µm are used.
Principle:
While filtering liquid samples of bacteria they are retained in the filter and can be isolated on agar plates.
Requirements:
1. Water sample.
2. Cellulose membrane with 0.45 µm pore size.
3. Filter holders, Buchner funnel with flask and electric vacuum pump.
4. Agar plates.
5. Bunsen flame/Laminar clean air flow.
Procedure:
1. Set up the assembly of Buchner funnel with cellulose membrane.
2. Pour water sample into the funnel and operate the pumps.
3. Remove filter. Bacteria can either be stained and observed or isolated on agar plates. Besides Nutrient Agar, Soil Extract, agar also is used.
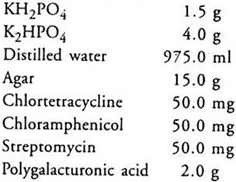
Soil Extract Agar:
Steam 1 kg garden soil in 1 litre of tap water for 30 minutes, decant, filter and use for dissolving the above chemicals.
Observation of Bacteria:
1. Direct Microscopic Observation of Soil:
The types and relative abundance of soil microorganisms can be determined by direct microscopic observation of soil, though their spatial relationships are disturbed during the preparation of slides.
Principle:
Through this method all microorganisms present in soil can be observed.
Requirements:
1. Soil sample.
2. Sterile 0.01% agar suspension in test tube.
3. Sterile pipette.
4. Slides.
5. Inoculation loop.
6. Ruled scale.
7. 0.1 (N) HCl.
8. Water bath.
9. Bunsen flame/Laminar clean air flow.
10. 1% aqueous Rose Bengal or carbol erythrosin/cotton blue, Rose Bengal.
11. Microscope.
12. Oil immersion.
13. Stage micrometer.
Procedure:
1. Weigh 1 g of soil (on a dry weight basis) and add it to 9 ml of 0.01% agar suspension in test tube.
2. Shake the mixture gently which gives 1:10 suspension.
3. Transfer 1/10 th ml of the suspension with
a sterile pipette to the center of a glass slide.
4. Spread this with a sterile wire loop uniformly over 4 cm2 of the slide by keeping a scale below the slide.
5. Allow suspension to dry in air and then fix it by immersing in 0.1 (N) HCl for one minute.
6. Briefly immerse the slide in water to wash excess acid and dry the slide on a flat surface over a boiling water bath.
7. Stain the material over a water bath with 1 % aqueous solution of Rose Bengal or carbol erythrosin and keep it for one minute.
8. Wash and air dry the slide.
9. Count microorganisms in 25 microscopic fields under oil immersion lens, the diameter of which is determined with a stage micrometer and calculate the area in square centimeter.
10. Calculate the number of microscopic fields in 4 cm2 and the total number of microorganisms, i.e. the number in 0.1 ml of a 1:10 soil dilution.
11. Since agar (commercial) contains bacteria, a control of agar count also should be done.
2. Hanging Drop Method:
Principle:
Bacteria are allowed to hang in a drop of liquid on a cover slip into a space in a cavity slide which will help in observing the motility.
Requirements:
1. 12 hour broth culture of Proteus vulgaris.
2. Cavity slides and cover slips.
3. Vaseline/petroleum jelly.
4. Match sticks.
5. Inoculation loop.
6. Oil immersion.
7. Microscope.
Procedure:
1. The cavity slide is cleaned, flamed and cooled.
2. Apply little vaseline around the cavity of slides.
3. Clean the cover slip and apply little vaseline with a match stick at the four corners.
4. Transfer one loop full of Proteus culture to the center of the cover slip, invert the cavity of the slide just above the cover slip so that the drop of culture is covered by the cavity of the slide.
5. Pick up the slide and turn it so that the drop of culture hangs from below the cover slip.
6. Examine first under low power of a microscope and reduced light and then under high power and oil immersion. Motility can be observed.
Staining of Bacteria:
Since bacteria are small and colourless they cannot be seen with naked eye. In order to study their properties and classify them, it is essential that they be stained with biological stains in order to observe them under microscope.
A stain is an organic compound having a benzene ring, a chromophore and an auxo- chrome group. Here, benzene is a colourless organic solvent; chromophore is a chemical group that imparts colour to benzene and auxochrome is the chemical group that conveys the property of ionisation to the chromogen which enables it to form salts and bind to the fibers or tissues.
There are two types of dyes:
i. Acidic and
ii. Basic.
Acidic dyes are anionic, i.e. on ionisation of the stain, the chromogen portion shows negative charge, thereby exhibiting a strong affinity for the positive constituents of cells, e.g. proteins are positively charged components of a cell. These positively charged proteins readily bind to, and accept the colour of the negatively charged anionic chromogen of an acidic stain like picric acid.
Basic dyes are canonic. On ionisation, the chromogen portion exhibits a positive charge and has a strong affinity for the negative constituents of the cell, e.g. nucleic acids are negatively charged cellular components which readily binds to, and accepts the colour of the positively charged, cationic chromogen of a basic stain like methylene blue.
Preparation of Bacterial Slides for Staining:
Principle
Heat fixation coagulates bacterial proteins and fixes them to the surface of slides.
Requirements:
1. Cultures of bacteria.
2. Slides.
3. Inoculating loop.
4. Bunsen flame.
5. Glass marking pencil.
6. 95% alcohol.
Procedure:
1. The slides should be cleaned with soda, followed by water and then rinsed with 95% alcohol.
2. Prepare a smear, by taking a loopful of culture and spreading it in the center of the slide.
3. Allow the smear to air dry.
4. Heat fix (otherwise bacteria will be washed away during staining) by passing it over a flame rapidly, two to three times.
Simple Staining:
This helps in elucidating the morphology and arrangement of cells. Here bacteria are stained with a single basic stain with a positively charged chromogen since bacterial nucleic acid and cell wall carry a negative charge.
Principle:
Basic stains like methylene blue, crystal violet and carbol fuchsin are positively charged ones which will be attracted to the negatively charged wall of the bacteria. This helps in elucidating the morphology and arrangement of bacterial cells.
Requirements:
1. 24-48 hour old Nutrient agar/broth cultures of Escherichia coli, Bacillus subtilis and Streptococcus.
2. Bunsen flame.
3. Staining tray.
4. Glass slides.
5. Microscope.
6. Oil immersion.
7. Slides.
8. Methylene blue.
9. Crystal violet.
10. Carbol fuchsin.
11. Glass marking pencil.
Procedure:
1. Prepare bacterial smears and heat fix.
2. Place the slides in the staining tray and flood them with one of the following stains.
Using appropriate exposure as shown below:
Carbol fuchsin 15,-30 seconds.
Crystal violet 20-60 seconds.
Methylene blue 1-2 minutes.
3. Hold the slide parallel to the stream of water and wash gently under tap water. This prevents loss of organism.
4. Blot dry the slide and examine under oil immersion.
Negative Staining:
Principle:
An acidic stain like India ink or nigrosin is used for this method. The acidic stain with its negatively charged chromogen will not penetrate the cells, since the cell surface is negatively charged. The cells, thus, remain unstained and can easily be seen against the black background of India ink.
The advantage of this method is that since it does not require heat fixing, the cells will not be distorted and will exhibit their natural shape and size. Secondly, some bacteria e.g. Spirilli, which are difficult to stain, can also be observed.
Requirements:
1. Agar cultures of Micrococci, Bacillus.
2. Bunsen flame.
3. Loop.
4. Staining tray.
5. Nigrosin/India ink.
6. Glass slides.
7. Microscope.
Procedure:
1. Place a drop, of nigrosin/India ink on a clean slide and a loopful of inoculum in the stain. Mix well with loop.
2. Place a second slide at 45° angle near the stain drop and push the mixture to form a thin layer.
3. Air dry (don’t heat) the slide and examine under the microscope.
Gram Staining:
Principle:
At least three chemical reagents are applied sequentially to heat fixed bacteria for differential staining. The first one is known as primary stain which imparts colour to all cells. To bring about colour contrast, a decolourising agent which may or may not remove the primary stain is used. This depends on the chemical composition of cellular components. The third reagent is a counter stain having a contrasting colour to that of the primary stain.
After decolonisation if primary stain is not washed off, the cells or components of cells do not retain the counter stain. If primary stain is washed off by the decolourising agent, then the cells will absorb the counter stain. This staining is known as Gram staining, named after Dr Christain Gram.
This staining divides bacteria into two major groups: the Gram-Positive and Gram- negative ones. It is mainly based on the chemical composition of bacterial cell walls. The Gram-positive bacterial cells have a thick peptidoglycan layer. This peptidoglycan layer in Gram-negative bacteria is much thinner and is surrounded by outer lipid containing layers.
Primary stain; Crystal violet:
Cells are stained violet by this stain which is used first.
Mordant Gram’s I2:
Gram’s Iodine is a mordant that increases the cells affinity for a stain by binding it to the primary stain, thus forming an insoluble complex-the Crystal violet-Iodine (CV-I2) complex. All cells appear purple black at this stage.
Decolourising agent: (95% alcohol) Ethyl alcohol serves as a protein dehydrating agent and also as a lipid solvent.
Two factors determine its action:
(i) concentration of lipids, and
(ii) thickness of peptidoglycan layer in bacterial cell walls.
In Gram-negative cells, the alcohol dissolves the lipids in the outer layers and increases the porosity of cell walls.
Thus from the thinner and less highly cross- linked peptidoglycan layer, the CV-I2 complex can easily be removed, leaving the cells colourless. However, in Gram-positive bacteria, the CV-I2 complex is retained as the pores are more smaller due to the dehydrating effect of alcohol, retaining the purple stain on the cells.
Counter stain; safiranin:
The Gram-negative bacteria, which are decolourised by ethyl alcohol, are stained red by safranin.
Requirements:
1. 24-hour-old cultures of Escherichia coli and Staphylococcus.
2. Crystal violet.
3. Gram’s I2.
4. Ethyl alcohol 95%
5. Safranin.
6. Staining tray.
7. Loop.
8. Slides.
9. Microscope.
10. Bunsen burner.
Procedure:
1. Prepare smears of cultures on clean slides, air dry and then heat fix.
2. Gently add crystal violet to the smears and allow to stand for a minute.
3. Wash under a gentle stream of tap water.
4. Flood slides with mordant I2 (Gram’s I2) and allow to stand for one minute.
5. Decolourise with 95% ethyl alcohol by adding it drop by drop until alcohol runs are almost colourless. Do not over decolourise.
6. Gently wash with tap water.
7. Blot dry and observe under oil immersion. Gram-positive bacteria will be purple and Gram-negative ones red.
Acid-Fast Staining (Ziehl-Neelsen Method):
Almost all bacteria can be stained by Gram staining. However, members of the genus Mycobacterium are resistant and can only be seen by acid-fast method. The stain is of diagnostic value since M. tuberculosis and M. leprae are human pathogenic forms.
Principle:
Mycobacteria have a thick waxy (lipoidal) wall which makes penetration of stains rather difficult and once it has penetrated, it is difficult to remove the stain even with vigorous use of acid or alcohol. Hence these organisms are known as acid-fast and others as non-acid- fast.
There are three different reagents:
This stain is soluble in the lipoidal material that constitutes the major portion of the wall of mycobacteria, penetrates it and is retained. Heating further enhances penetration which drives the carbol fuchsin through lipoidal wall into cytoplasm. Use of a wetting agent (Turgitol) to the stain circumvents the use of heat. This is a modification of Ziehl-Neelsen method which reduces surface tension between the cell wall of mycobacteria and the stain. After application of stain, all cells appear red.
Decolourising agent:
Acid-alcohol (3% HCl + 95% ethanol).
When acid-alcohol is added, the acid-fast bacteria will not be decolourised, since primary stain is more soluble in the waxes of the cells than in acid-alcohol. Mycobacterium will retain red colour where as non-acid-fast ones will get decolourised due to lack of cellular waxes.
Counter stain; Methylene blue:
Non-acid-fast bacteria alone will absorb this counter stain while acid-fast ones retain red colour.
Staining Procedure:
Requirements:
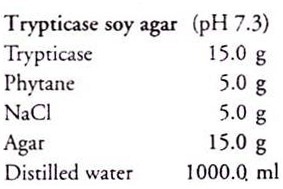
1. 72-96 hour cultures of Mycobacterium smegmatis in trypticase soy broth and 24-hour-old culture of Staphylococcus on Nutrient Agar.
2. Carbol fuchsin.
3. Acid-alcohol.
4. Methylene blue.
5. Bunsen flame.
6. Inoculating loop.
7. Slides.
8. Microscope.
Procedure:
1. Prepare smears of bacteria, air dry and heat fix.
2. Flood, smears with carbol fuchsin and place over a beaker with water on a hot plate (water bath) and steam for 5 minutes. Do not allow stain to evaporate or boil.
A modification: Heatless method
Flood smears with carbol fuchsin containing turgitol for 3-5 minutes.
3. Wash with tap water (for heated slides allow them to cool and then wash).
4. Decolourise with acid-alcohol adding the reagent drop by drop until alcohol runs almost colourless or has slight red tinge.
5. Wash with tap water gently.
6. Counter stain with methylene blue for two minutes and wash gently under tap water.
7. Blot dry and observe under oil immersion lens.
Staining of Spore:
Principle:
Aerobic Bacillus and anaerobic Clostridium and Desulfotomaculum produce spores under unfavourable environmental conditions. There are two stains used for staining spores.
Primary stain; Malachite green:
After adding this stain, heat has to be applied on the smear. Both vegetative cells and spores appear green.
Decolourising agent; Water:
Water cannot remove stain from spores. It removes, only excess of stain from spores and decolourises vegetative cells.
Counter stain Safranin:
Spores retain green colour after decolourisation and the decolourised vegetative cells are stained red.
Staining Procedure:
Requirements:
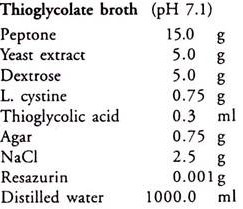
1. 48-72-hour-old cultures of Bacillus cereus and thioglycolate broth cultures of Clostridium butyricum.
2. Malachite green.
3. Safranin.
4. Bunsen flame.
5. Staining tray.
6. Inoculating loop.
7. Glass slide.
8. Microscope.
Procedure:
1. Make smears of bacterial cultures, air dry and heat fix.
2. Flood smears with malachite green and place on a warm hot plate and steam for 2-3 minutes. Don’t allow stain to evaporate or boil. Add more stain if needed.
3. Remove slides, cool and wash with tap water.
4. Counter stain with safranin for 30 seconds.
5. Wash gently with tap water, blot dry and observe under the microscope. Spores will appear green and vegetative cells red.
Staining of Capsule:
Principle:
Capsule is a gelatinous substance secreted by the cell and adheres to the cell wall. Cells with heavy capsules are virulent and capable of producing disease, because capsule protects the bacteria against normal phagocytic activities of host cells. Capsule is a glycoprotein, a polysaccharide or a polypeptide.
Staining of capsules is difficult since they are water soluble and may be dislodged or removed while washing. Smears should not be heated since cells may shrink and a clear zone will be left around the organism—an artifact that can be mistaken for a capsule.
There are two reagents:
1. Primary stain; Crystal violet (1% aqueous).
The cell and capsular material will take this colour.
2. Decolourising agent and counter stain:
Copper Sulfate, (20%):
Unlike bacterial cell wall, capsule is non-ionic and hence primary stain will adhere to the capsule without binding to it. Capsule is water soluble. Hence QuSO4 is used to wash the primary purple stain out of the capsular material without removing the stain that is bound to the cell wall. QuSO4 also acts as a counter stain since it is absorbed into the decolourised capsular material. The capsule will be light blue and the cell deep purple.
Staining Procedure:
Requirements:
1. 48-hour-old skimmed milk cultures of Acaligenes viscolactis, Leuconostoc mesenteroides and Enterobacter aerogenes.
2. 1% crystal violet.
3. 20% copper sulfate.
4. Bunsen flame.
5. Inoculating loop.
6. Staining tray.
7. Slides.
8. Microscope.
Procedure:
1. Place 1-2 drops of crystal violet on a clean glass slide. Add 3 loopful of culture and mix gently with the loop.
2. Make a thin layer of smear with the help of another slide placed at 45° angle near the drop and pull gently. Allow to stand for 5-7 minutes, air dry-do not heat.
3. Wash with 20% CuS04. 7H2O.
4. Blot dry and examine under the microscope. Capsule appear light blue and the cells deep purple.
Staining of Flagella:
Principle:
Flagella of bacteria are extremely thin and can best be demonstrated under an electron microscope. In order to observe flagella under oil immersion of light microscope it is necessary to stain it. For this, there are special staining methods which require careful attention to the details of the technique. By this method, the flagella are thickened to at least ten fold by superficial deposition of stain.
Leifson’s Modified Method:
Basic fuchsin along with tannic acid is deposited on the flagella and bacterial cell, from an evaporating alcoholic solution. Staining is controlled by an exact determination of the time of exposure of the smear.
Requirements:
A. Stain; Basic fuchsin with tannic acid:
Tannic acid – 10.0 g
NaCl – 5.0 g
Basic fuchsin – 4.0 g
B. Thoroughly mix the three powders and keep in a stoppered bottle. Add 1.9 g of this mixture to 33 ml of 95% alcohol (ethyl). When most of it dissolves (takes 10-15 minutes), add distilled water and make up the volume to 100 ml. Adjust pH to 5.0 by adding NaOH or HCl store in stoppered bottle in refrigerator at 3°-5°C. Alternately prepare stock solutions.
1. Tannic acid 3% (W/V) in water, with 2% phenol (W/V) as preservative.
2. NaCl 1.5% (WV) in water.
3. Basic fuchsin 1.2% (W/V) in 95% ethyl alcohol. pH must be 5.0.
a. To prepare the stain, mix the three solutions in exact equal proportions.
b. Culture of Shigella.
c. Clean dry glass slides.
d. Inoculation loop.
e. Centrifuge-horizontal one.
f. Stop watch.
g. Staining rack.
h. Bunsen flame.
i. 95% ethyl alcohol.
j. Methylene blue.
k. Formaldehyde (1-2% V/V).
Procedure:
1. Mark a clean slide with a diamond pencil holding one end of the slide with forceps.
2. Fix the culture by adding formaldehyde (1-2% V/V) in the tube and sediment bacteria by centrifuging at 2000—3000 rpm preferably in a horizontal centrifuge.
3. Decant supernatant gently and re-suspend the bacteria in distilled water (gently) by gently rolling the tube in between palms.
4. Centrifuge decand and re-suspend sediment in fresh distilled water to obtain a thin suspension.
5. Place a loopful of suspension on the clean dry slide over an area of 1-2 cm in diameter.
6. Air dry (do not heat fix) and place the slide on a levelled staining rack gently.
7. Pipette out exactly 1ml of the stain on the smear in order that the stain covers the smear.
8. Leave under room temperature for the required time using a stop watch. From 6, 8, 10 or 12 minutes select the best time for staining. Thickness of deposition of stain on the flagella increases with increased time.
9. Rinse off stain by placing the slide under a slow running tap water. Do not pour the stain off before rinsing.
10. Counter stain with methylene blue, e.g. with borax methylene blue for 30 minutes to colour the bacterial protoplast.
11. Wash with water, rinse with distilled water, blot dry and observe under oil immersion.
Note: All procedures should be carried out gently. Otherwise the flagella will get sheded.


